A dryer is a must-have appliance for every home in the US. So, many aspects of the dryer need your attention as you know that a dryer comes with an exhaust pipe that releases hot air into the surrounding. One side of the exhaust tube is connected to the dryer, while the other end is attached to the wall. While the processed air passes through the tube, lint accumulates in the vent that blocks the exhaust and restricts airflow. It is a significant fire hazard and a risk to life. While you can avail of professional service, it is also vital that you know how to replace a dryer vent hose inside a wall. For that, you need to read this article.
Why Is It Important to Care for The Dryer Exhaust Pipe?
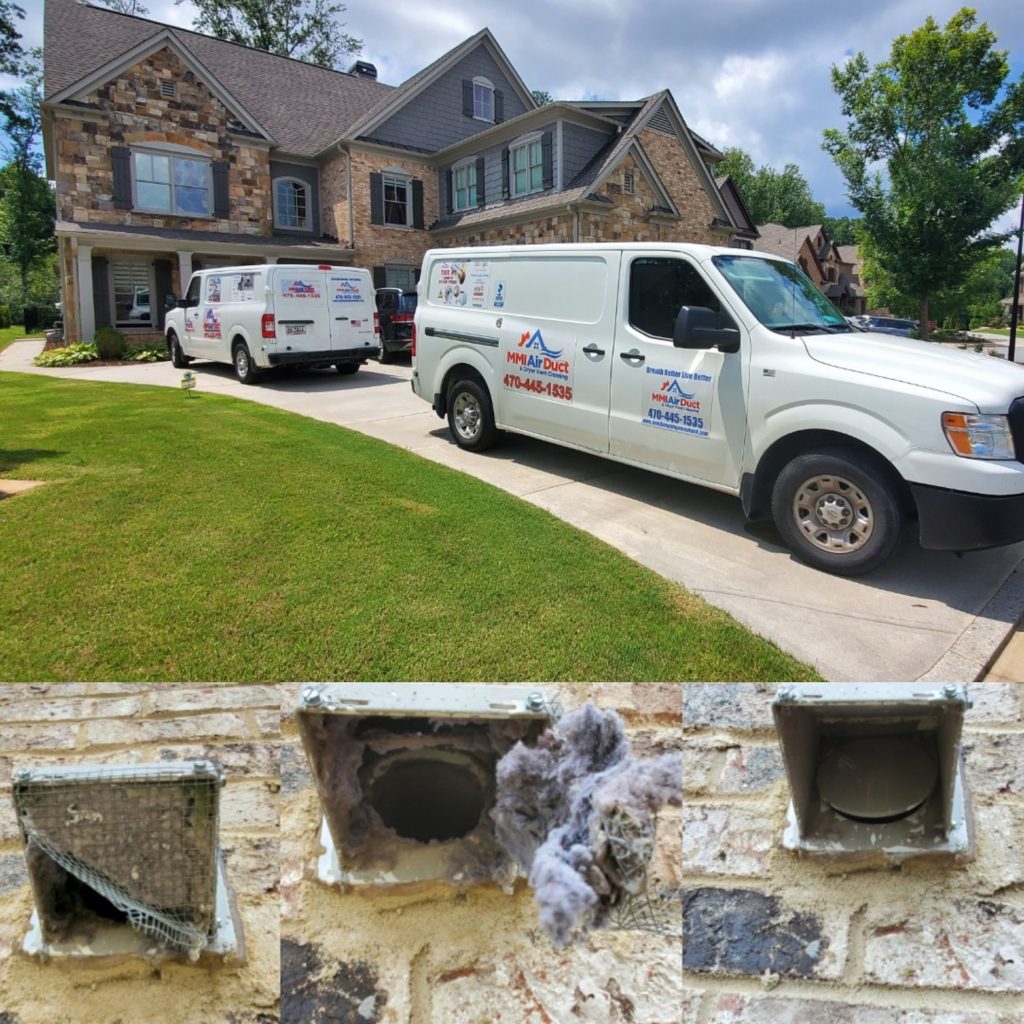
You need to exhaust your dryer in the surroundings to discharge the moisture from the laundry region, avoid lint build-up on the surfaces, and discharge some of the produced heat. So, when your dryer exhaust is damaged, it may lead to lint build-up within the dryer. The National Fire Protection Association validates that lint can easily ignite the fire and put your life at risk.
While a damaged lint can also cause a delay in the drying of clothes, leading to high energy bills, it is vital to replace the exhaust hose to avoid any loss and keep your dryer working efficiently.
You know that lint accumulation within the dryer vent is risky, as it clogs the exhaust tube and restricts airflow. Also, electrostatic discharge can light a fire. So, regular examination and urgent replacement are vital for safety.
The benefit of a Strong Structure
The vent pipe made of solid metal can withstand high air pressure. So, the benefit of this strong structure is that it can fit firmly to the wall that spares no space for the air escape. Hence, it enables optimum functioning of the appliance and helps prevent lint build-up.
How to Fix a Dryer Exhaust Hose Inside a Wall?
If your dryer exhaust pipe is clogged, you can follow the below-mentioned step-by-step guide on how to replace the dryer vent hose inside the wall without destroying it.
Gather Equipment
You will require appropriate material, tools, and equipment for smooth task completion. So, whether you are a professional Dryer Vent Cleaning in Norcross, GA, or a DIY enthusiast, you must prepare your tools for the task.
You must be aware that replacing a vent tube within the wall is a simple task. The reason is that you can purchase an entire package of items required for installation.
Following are the primary requirements for the replacement process:
- A complete dryer hose kit
- Aluminum Duct Tape
- Tiny Exhaust Dent Brush
- Vacuum Cleaner
- Screwdriver or Socket Driver
- An adjustable wrench or spanner
- Plywood
- Plug
- Tin Clips
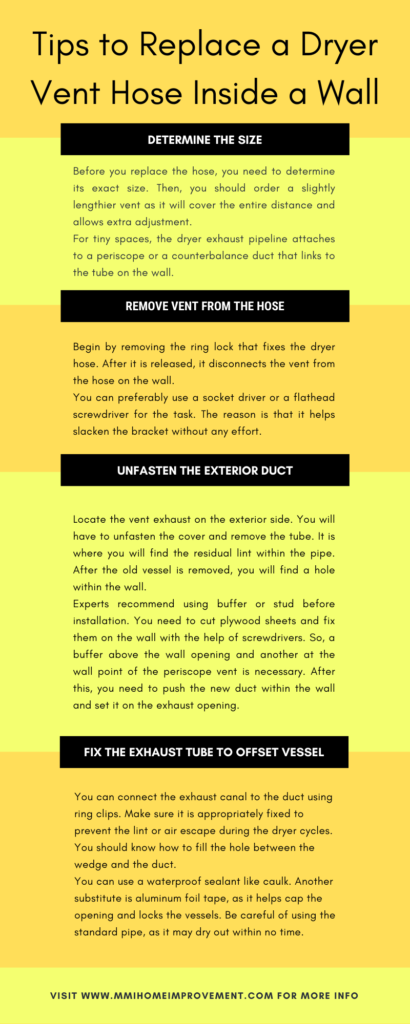
Determine The Size
Before you replace the hose, you need to determine its exact size. Then, you should order a slightly lengthier vent as it will cover the entire distance and allows extra adjustment.
For tiny spaces, the dryer exhaust pipeline attaches to a periscope or a counterbalance duct that links to the tube on the wall.
And for the tight spaces, Builder’s Best 084149 Dryer Periscope is ideal. You can easily purchase it online. It is a portable piece of equipment that is ideal for tight spaces. Apart from this, you may require a 2.5 inches’ clear area from the wall to your dryer appliance.
Remove Vent from the Hose
Begin by removing the ring lock that fixes the dryer hose. After it is released, it disconnects the vent from the hose on the wall.
You can preferably use a socket driver or a flathead screwdriver for the task. The reason is that it helps slacken the bracket without any effort. Also, it is a multi-purpose tool that you can adjust as per your choice.
Unfasten the Exterior Duct
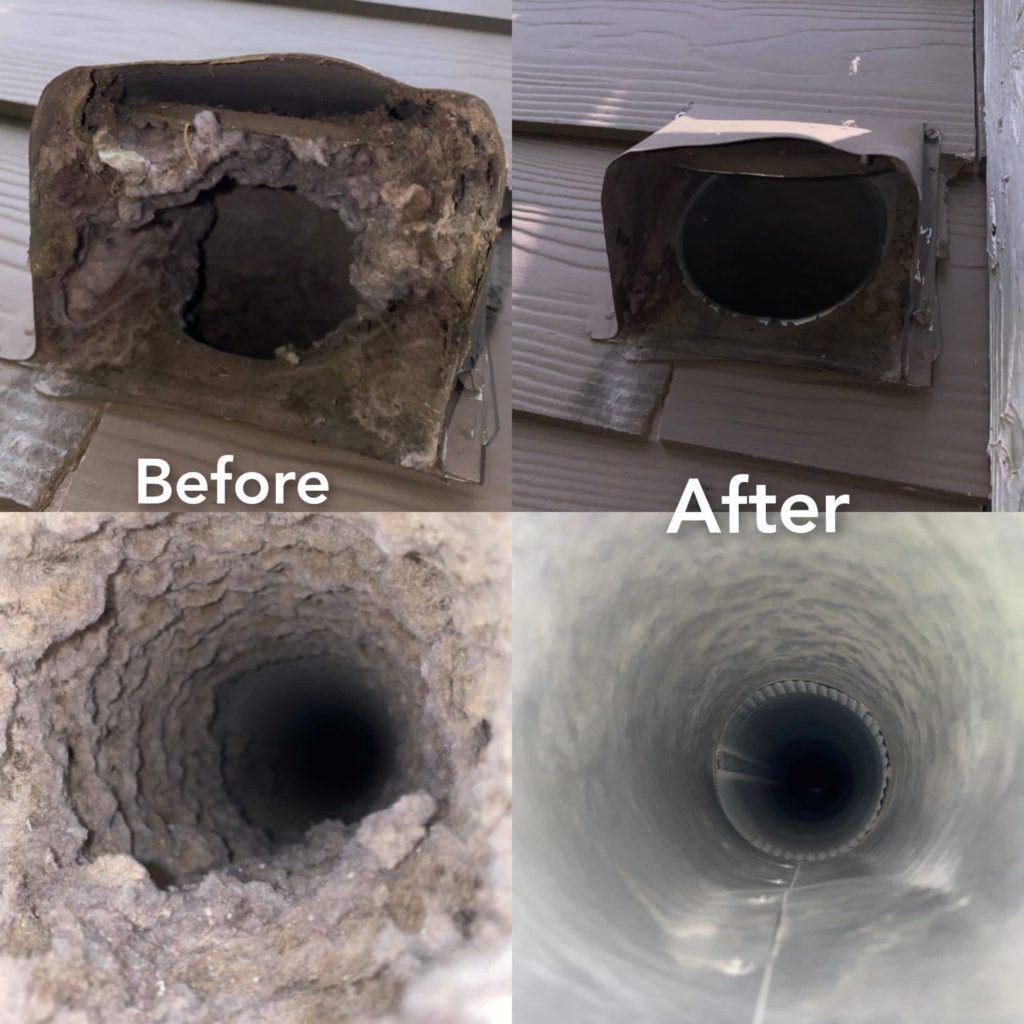
Locate the vent exhaust on the exterior side. You will have to unfasten the cover and remove the tube. It is where you will find the residual lint within the pipe. Since the tube is attached to the wall, you will have to apply a little force to push it inside and altogether remove it.
After the old vessel is removed, you will find a hole within the wall. You can use the vent brush to remove any debris that might be hindering the channel. Experts recommend using buffer or stud before installation. It will ensure that the dryer escape does not displace even an inch after being successfully installed.
You need to cut plywood sheets and fix them on the wall with the help of screwdrivers. So, a buffer above the wall opening and another at the wall point of the periscope vent is necessary. After this, you need to push the new duct within the wall and set it on the exhaust opening. Make sure that the duct is the same size as the old one. Otherwise, the fitting might not be perfect. Then, you need to push within the wall gently and tightly fix it. However, if the vent protrudes from the wall, you can use tin clips for resizing.
Re-fix the Exhaust Tube to the Offset Vessel
Before you fix the exhaust tube to the offset vessel, you must clean it carefully. Using a vacuum cleaner would be ideal for removing the lint.
Then, you can connect the exhaust canal to the duct using ring clips. Make sure it is appropriately fixed to prevent the lint or air escape during the dryer cycles. You should know how to fill the hole between the wedge and the duct. You can use a waterproof sealant like caulk. Another substitute is aluminum foil tape, as it helps cap the opening and locks the vessels. Be careful of using the standard pipe, as it may dry out within no time.
Use the below code to Embed this info-graphic
Fix the Duct with Screws
After this, you should go outside to fix the duct with screws and attach the hood to complete the task.
Return Dryer to its Original Place
Force the dryer gradually towards the wall. Then turn on the power to validate if your dryer is functioning or not. You may also check whether the dryer is releasing air through the duct or not.
If you feel uncomfortable performing this task yourself, you can reach out to the professional Heating and Air Conditioning Service in Norcross, GA, like MMI Home Improvement.