Every home in Cumming needs a reliable heating and cooling system to stay comfortable in all seasons. Whether it’s the warmth of summer or the chill of winter, a well-installed duct system keeps your indoor air fresh and balanced. If you are planning Air Duct Installation in Cumming, it’s important to understand how the process works. Proper HVAC duct installation not only improves airflow but also saves energy and keeps every room at the right temperature.
Here we explain seven easy steps to help you understand how HVAC ducts are installed. It’s simple enough for anyone to follow, even if you’re new to how these systems work.
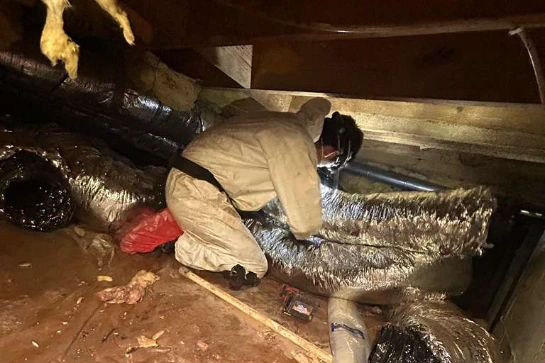
Step 1: Maintenance Tips After HVAC Duct Installation
Before you begin any installation, planning is the most important step. Think about where each duct will go. Measure the spaces where the ducts will pass, like ceilings, walls, or attics. A good plan helps air move easily through your home and reach every corner.
Try to keep the duct routes short and straight. The more turns and twists there are, the harder it is for air to move. Fewer bends mean better airflow and less energy waste. You can draw a simple sketch of your home and mark where the main ducts and smaller ducts will go. This helps you see the full picture before you start.
Read Also: Is it necessary to hire a professional for an air duct installation?
Step 2: Choose the Right Duct Type
Choosing the right type of duct makes installation easier and improves performance. There are a few types to pick from:
- Sheet Metal Ducts: Made from metal, these are strong, durable, and last for many years.
- Flexible Ducts: These are bendy and easy to fit in small spaces.
- Fiberglass Ducts: These are covered with insulation to keep the air warm or cool.
Each type has its own benefits. For example, flexible ducts are great for short runs, while sheet metal ducts are best for main lines. Pick the type that suits your home’s size and design.
Step 3: Measure and Cut Accurately
Measuring is the key to a successful HVAC duct installation. Every inch matters. If a duct is too long or too short, air might leak, or the system might not fit right.
Use a measuring tape to mark where you’ll cut. Always double-check your measurements before cutting. If you’re cutting metal ducts, use tin snips or a saw made for metal. After cutting, smooth out the edges so they don’t cause injuries or leaks.
Taking your time in this step saves you from future problems and makes the installation look neat and professional.
Step 4: Install the Main Trunk Line in HVAC Duct Installation
The trunk line is like the main highway for air in your home. It carries air from the furnace or air conditioner to smaller branch ducts that reach each room.
Start by placing the trunk line first. Make sure it’s straight and supported with strong metal hangers. The trunk line should be secure so it doesn’t move or sag. Every joint where two ducts connect should be sealed tightly with foil tape or mastic sealant. This keeps the air inside the ducts and prevents leaks.
When the trunk line is installed properly, it helps the whole system work smoothly and efficiently.
Step 5: Attach Branch Ducts During HVAC Duct Installation
Now it’s time to connect the branch ducts. These smaller ducts take air from the main trunk line to each room. The goal is to make sure every room gets the same amount of air.
Each branch should be the right size for its room. A larger room may need a bigger duct, while a smaller room can use a narrower one. Try to avoid too many bends, since sharp turns can slow down the airflow.
Use elbows and connectors to attach branches neatly. Always seal the joints to stop air from escaping. Label each branch so you know which room it serves. This makes future maintenance much easier.
Step 6: Add Insulation and Seal the Ducts
Insulation keeps the air inside the ducts at the right temperature. In winter, it stops warm air from escaping. In summer, it keeps cool air from heating up. Insulated ducts also prevent condensation that can lead to mold.
Wrap each duct with insulation material designed for HVAC systems. Make sure there are no gaps. Then check every joint for leaks. If you find one, seal it with foil tape or mastic sealant.
Good insulation and sealing make your HVAC system more energy-efficient. This means your home stays comfortable while you spend less on energy bills.
Step 7: Test the System After HVAC Duct Installation
Once your HVAC duct installation is complete, it’s time to test the system. Turn on your HVAC unit and check every vent to make sure air is flowing evenly. Each room should get enough air without strange noises or weak airflow.
If you notice one room is cooler or warmer than the others, there might be a blockage or leak. You can use a pressure gauge to check air movement. This helps you spot problems early and fix them before they cause damage. Testing ensures that your ducts are working properly and your home stays comfortable in every season.
Maintenance Tips After HVAC Duct Installation
Keeping your ducts clean and in good shape helps your HVAC system last longer. Here are a few simple maintenance tips:
- Check ducts every six months for leaks or dust buildup.
- Clean air vents and replace filters often.
- Inspect insulation for damage and replace if needed.
- Schedule a professional duct cleaning every two to three years.
By taking care of your ducts, you can enjoy cleaner air, lower energy costs, and fewer repairs in the future.
Summary
Learning the steps of HVAC duct installation helps you understand how your home stays comfortable. From planning the layout to sealing and testing, every step plays a role in keeping the air flowing smoothly.
Whether you are doing a small project or hiring professionals, knowing the process gives you confidence. A well-installed duct system saves energy, keeps your air clean, and makes your home a better place to live.