A dryer vent is an essential component of your home dryer because it directs wet exhaust air out of your home, preventing it from interacting with harmful gasses. Though installing a new dryer vent pipe may appear overwhelming, the process is pretty basic and uncomplicated if you know what to do.
METHOD 1 - Cutting and Attaching a Flexible Vent Hose
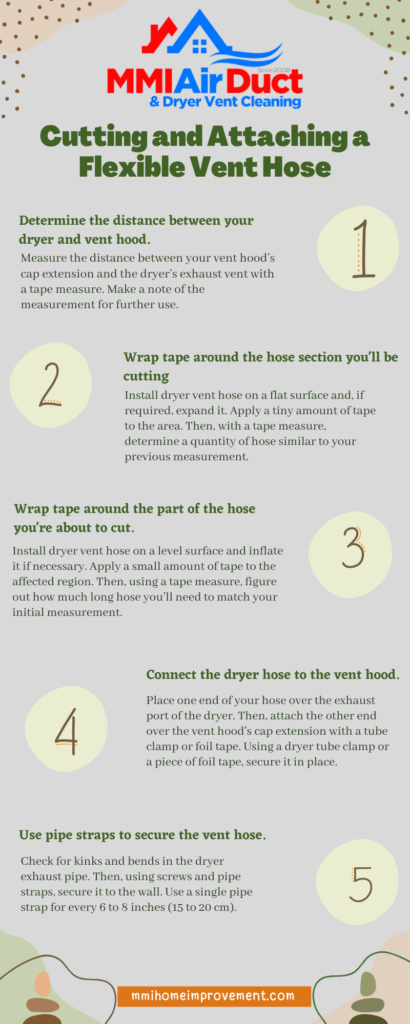
Determine the distance between your dryer and vent hood.
Measure the distance between your vent hood’s cap extension and the dryer’s exhaust vent with a tape measure. Make a note of the measurement for further use.
Wrap tape around the hose section you'll be cutting.
Install dryer vent hose on a flat surface and, if required, expand it. Apply a tiny amount of tape to the area. Then, with a tape measure, determine a quantity of hose similar to your previous measurement.
Wrap tape around the part of the hose you're about to cut.
Install dryer vent hose on a level surface and inflate it if necessary. Apply a small amount of tape to the affected region. Then, using a tape measure, figure out how much long hose you’ll need to match your initial measurement.
Connect the dryer hose to the vent hood.
Place one end of your hose over the exhaust port of the dryer. Then, attach the other end over the vent hood’s cap extension with a tube clamp or foil tape. Using a dryer tube clamp or a piece of foil tape, secure it in place.
Wrap the foil tape across the connecting seams to use it.
To use a tube clamp, loosen it by unscrewing it. It should be slipped onto the hose, lined up over the connecting seam, and then tightened again.
Use pipe straps to secure the vent hose.
Check for kinks and bends in the dryer exhaust pipe. Then, using screws and pipe straps, secure it to the wall. Use a single pipe strap for every 6 to 8 inches (15 to 20 cm).
Use the below code to Embed this infographic
METHOD 2 - Cutting and Fashioning a Rigid Vent Hose
Measure The distance between your dryer and vent hood.
Measure the distance between your dryer’s exhaust vent and the vent hood with a tape measure. To account for any curves or bends, measure the route as though the hose was already constructed. Make a note of the vent measurement for future use.
Place the hose on a solid surface.
Take a section of hose that hasn’t been joined yet, so it appears more like a sheet than a pipe. After that, place it on a level, stable surface, such as a wooden table. Flatten it using your hands, To make the hose simpler to operate.
Make a mark on the area where you'll be cutting.
Measure out the same quantity of hose as the previous measurements. Then, using a Sharpie or a piece of tape, mark the location. Make many markings around the hose to make cutting simpler.
Mark the length you’ll need for the segment you’re preparing if you’re going to assemble your vent with various components.
Using snippers, cut the vent.
Put on a pair of thick working gloves to protect yourself from the blade and the pipe’s edges before you start cutting. Then, carefully cut through the specified region on the hose with a pair of aircraft or tin snips.
Press the edges of the hose together.
You can quickly install a dryer vent hose since they have minimal seams at the edges. Squeeze the seams against one other until they snap together, then press down on the hose to lock them, doing it throughout the whole length of the vent piece.
METHOD 3 - Connecting the Rigid Hose to the Dryer and Vent Hood
If required, join the hose sections together.
Unless you’re using a single piece of dryer vent pipe, you’ll have to put everything together in one continuous piece. Slide the crimped end of one elbow piece into the hose if you’re using elbow pieces. If you’re connecting numerous hose segments, use an aluminum duct connection to link them.
Wrap foil tape across the connecting seams of joint parts to help keep them together.
Connect the hose to the dryer.
If required, move your dryer out of the way and slip the hose’s bottom end, or the lower elbow piece, over the dryer’s rear exhaust port. Now, if the seam appears to be slack, use foil tape or a hose clamp to fix it.
If you're using foil tape, wrap it around the connecting seam.
If you’re using a tube clamp, unscrews are covered with foil tape. The dryer vent should then be pressed against the wall and secured using pipe straps and simple screws. Use a pipe strap for every 6 to 8 in (15 to 20 cm) hose for safety.
Dryer Vent Installation & Repair in Roswell
If you are looking for someone to get a dryer vent installation and repair in Roswell, we can help you. Our professionals can assist you with All of your dryer vent needs.
- Residential and Commercial Service
- Dryer Vent Installation
- Dryer Vent Repair
- Professional Service
- Dryer Vent Replacement
- Dryer Vent Cleaning
UV Light in Roswell GA
While vaccines are still being carried out worldwide, with new varieties appearing, it is evident that they are insufficient; Hence, it is becoming clear that our society will have to cope with COVID Omicron, Delta, Lambda, and other SARS-CoV-2 viral types soon. Ultraviolet radiation, which is used all around the world, is a safe and effective way to kill practically all viruses and bacteria in the air, including SARS-CoV-2. You can get service of UV light in Roswell, GA, to save your ducts from viruses.
We need to introduce new tools to the struggle to offer clean air for interior settings. UV Light is a tried-and-true technique that has been used successfully for many years in medical sterilization and food safety. The same technology is now being used to keep children safe in schools and critical infrastructure operators.
For over 30 years, we’ve been offering UVC solutions to various sectors, including medical institutions and food processing. We’re now bringing those exact solutions to schools, offices, and other locations worldwide. We offer UVC solutions for practically every application imaginable, with over 200 items accessible. Mobile fans, higher air, and equipment that work directly with existing HVAC systems are all available. There are no filters required; just high-powered UVC virus-killing light is needed.