The good news is that Dryer Vent Installation to an exterior vent using an aluminum-foil exhaust ducting is simple. The spiraled-wire inner is exceptionally strong and flexible, and this hose-like product is affordable at 50 cents to $1 per foot. However, ducting isn’t the ideal option: it doesn’t perform a good job of draining hot air and can be harmful in some circumstances.
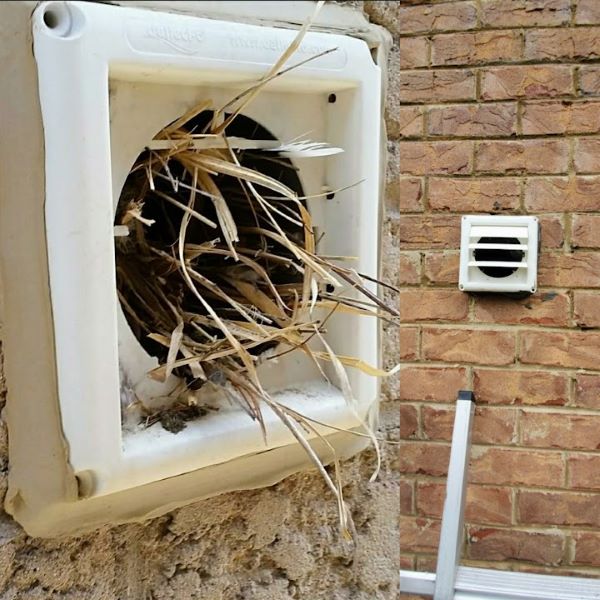
A new outdoor dryer vent installation is simple and the cover is affordable as well. So, there’s no reason to leave your damaged one in place. If it’s stuck open, you may have a rat’s nest in your dryer vent, and if it’s jammed closed, you may have a dryer fire. Dryer fires are not uncommon.
Make sure you have access to the present dryer vent cover before beginning this project. The dryer vent frequently goes via a crawlspace, where there may be a restricted area for movement. If crawling around on your tummy on the ground isn’t your thing, you could decide that this is a task best left to a handyman, no matter how easy it is.
A properly working outside dryer vent cover is vital to the running of any house. Without it, lint and warm damp air may back up into the home. It can cause mold or other damage inside or to the house’s structure.
Because of prefabricated units with all-in-one designs, replacing a vent cover is easy. You can easily screw them into the home through a hole and connect them to the dryer duct on the inside. Get the service of air duct sanitizing in Gainesville GA on time to avoid duct problems
Dryer Vent Installation
Install a smooth metal dryer vent to speed up drying and avoid lint buildup. These step-by-step instructions will guide you through the difficult aspects. Flexible plastic and metal vents trap more lint, need more cleaning, and can impede airflow. Rigid metal vents are safer. Worse, flexible ducts are easily crushed, obstructing airflow and causing the dryer to overheat, which can lead to lint fires. We’ll teach you how to cut and install a 4-inch rigid metal duct, including the most difficult part: drilling the exit hole through an external wall.
Steps for Replacing Dryer Vents Outside Covers
- Taper the caulk seal around the dryer vent cover and along the house’s side. If you press too hard, you may cut through the external wall material. Using a tiny putty knife, remove any residual caulk from the home. Remove as much caulk as possible.
- Remove the long mounting screws that hold the vent cover housing in place. To avoid harming the screw holes, loosen each screw a bit at a time before going on to the next and continuing until finished. This will assist keep the holes in the line and increase the likelihood that you will be able to reuse those holes.
- Extend the vent cover housing through the opening. It may have settled in place and will take a gentle tug to remove. Pull it straight out to avoid damaging the hole or any insulation.
- Examine the hole for any issues. Examine the vent cover for any rotting, lint buildup, or other damage that might make connecting the new vent cover difficult.
5. Insert the new vent cover into the hole, but do not bend the metal ducting that is linked to it. After installing any insulation or weather stripping, press the new unit flat against the house.
6. Put the screws into the holes left by the old vent cover. Tighten them equally, exactly like you did when you took the screws out evenly. This will guarantee that the unit is perpendicular to the home. To keep insects and the weather out, apply a bead of caulk along the outer border of the unit.
TIP
To prevent having visible caulk around the vent, use clear caulk to seal the region. Place washers between the unit and the house. It will offer additional stability if the alignment of the prior unit’s holes is not proper.
WARNING
When clipping the old caulk, use caution since it is quite simple for a hand to slide when cutting.
When handling the dryer vent cover assembly, wear gloves. On the backside, the incorporated metal ducting features sharp edges.
A Word to the Wise
Turn on the dryer and make sure there’s enough air blowing through the aperture to produce a breeze before replacing the vent cover. If you have a flapper-style cover and the flappers aren’t fluttering, it means there isn’t enough air entering through the vents.
If the dryer vent isn’t getting any air, it has to be cleaned. Cleaning is easier to do after removing the previous vent cover and before replacing it. This step should not be skipped since lint buildup in dryer vents is the leading cause of dryer fires.
Dryer Vent Cleaning in Gainesville, GA
Looking for a dryer vent cleaning service that is close to Gainesville, GA and provides excellent service? That’s us, MMI Home Improvement!
Now, let’s discuss how not cleaning your dryer vent impacts your everyday life, from bills to health. By cleaning your dryer vent, you may avoid the following:
- High energy expenses; may be mentioned on every Canton dryer vent cleaning website. However, cleaning the dryer vent removes a coating of lint; keeping this on and without cleaning it away might ultimately raise your power bill.
- Cleaning the dryer vent also helps with the machine’s longevity. This can be done by reducing emergency repairs and allowing the machine to last much longer than usual. Get air duct repair and replacement service in Gainesville GA from us.
MMI Home Improvement in Canton, GA will clean your dryer vent so you may avoid these issues and other problems.